Installation and configuration of Siskin IM
Preamble: In this article, I describe the installation and configuration of Siskin IM. I wrote it in June 2021. Since then, new Siskin IM versions were released. Today, some steps of this tutorial might differ. I will update this article soon.
- Update 2022-10-02: Trashserver.net has been removed from the list of providers.
Siskin IM is a good choice if you want to use an XMPP account on your iPhone or iPad. You can get Siskin IM from the App Store (external). Please keep in mind that Siskin IM is available in English only.
When you install Siskin IM there are some settings which can be optimized. This will be explained in this tutorial.
Siskin IM has some nice feature:
- encrypted chats and group chats
- sending and receiving files/pictures
- audio- and videocalls
- recording and sending voice messages (Siskin IM 7.0)
- Sending your geolocation (Siskin IM 7.0)
Registering an XMPP account
At first you should register an XMPP address (if you do not already have one). You have the choice between a lot of different XMPP providers. Your XMPP address will be the username you choose followed by the @-sign and the domain of the chosen provider.
Some examples for XMPP providers are:
- magicbroccoli.de: Registration (external)
- wiuwiu.de: Registration (externer Link)
- You can also choose a provider by looking at this list: (external)
Starting Siskin IM for the first time
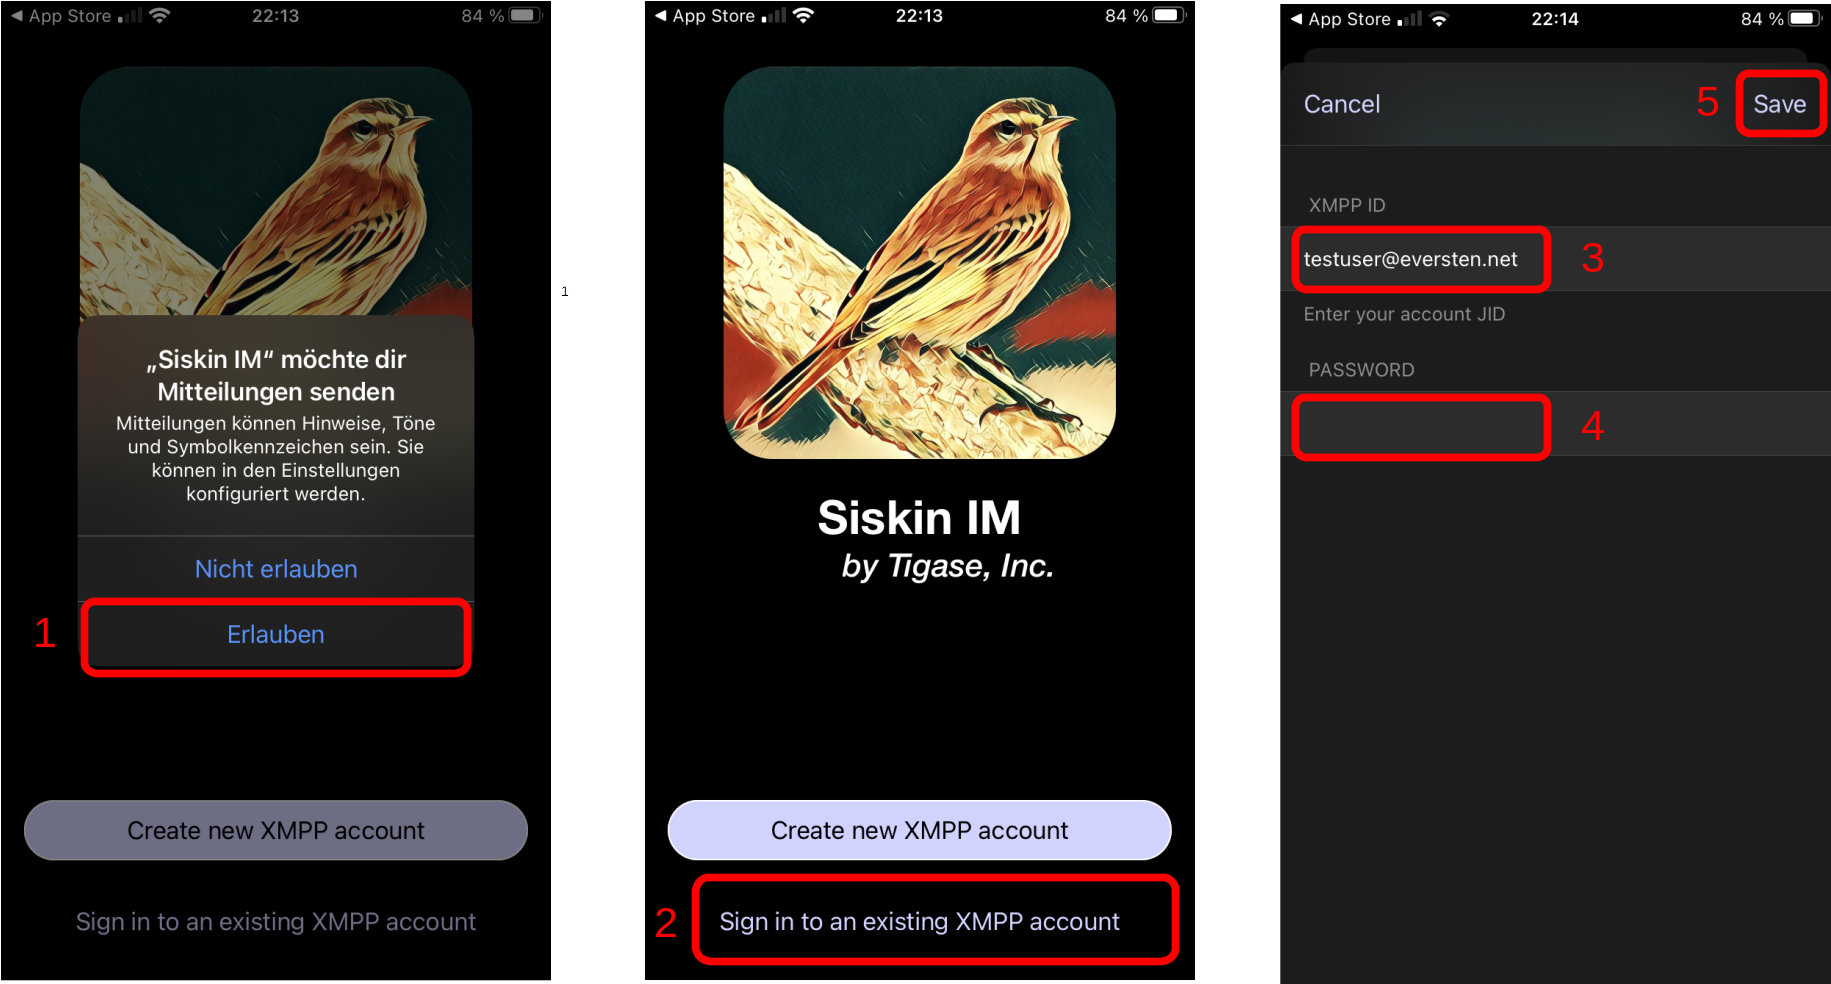
After downloading Siskin IM from the App Store you can start it by clicking the Siskin IM icon. At first Siskin IM asks if it is allowed to send notifications. You should allow Siskin IM to do so.
Now you select Sign in to an existing XMPP account since you already registered an address in the previous section. Afterwards, you have to enter your XMPP address, your password and finish these steps by clicking Save. Please keep in mind that in this tutorial the XMPP address testuser@eversten.net is used as an example account.

You will see a notification, which asks if you want to allow the Siskin server to send you Push Notifications. You should enable this setting to get notifications (even if the app is in the background). Siskin will now show you your XMPP address and that the setting Message Synchronization is activated. You can simply click on Done.
Your XMPP address is now configured to be used in Siskin IM. In the next section I will describe how to optimize some settings.
Optimizing some settings
Now, we want to optimize some settings inside Siskin IM. In this tutorial the following changes are done:
- activation of end-to-end-encryption
- requesting delivery receipts
- activation of auto-authorization of contacts
- optimization of settings for file exchange (files and pictures)
- activation of group chat synchronization
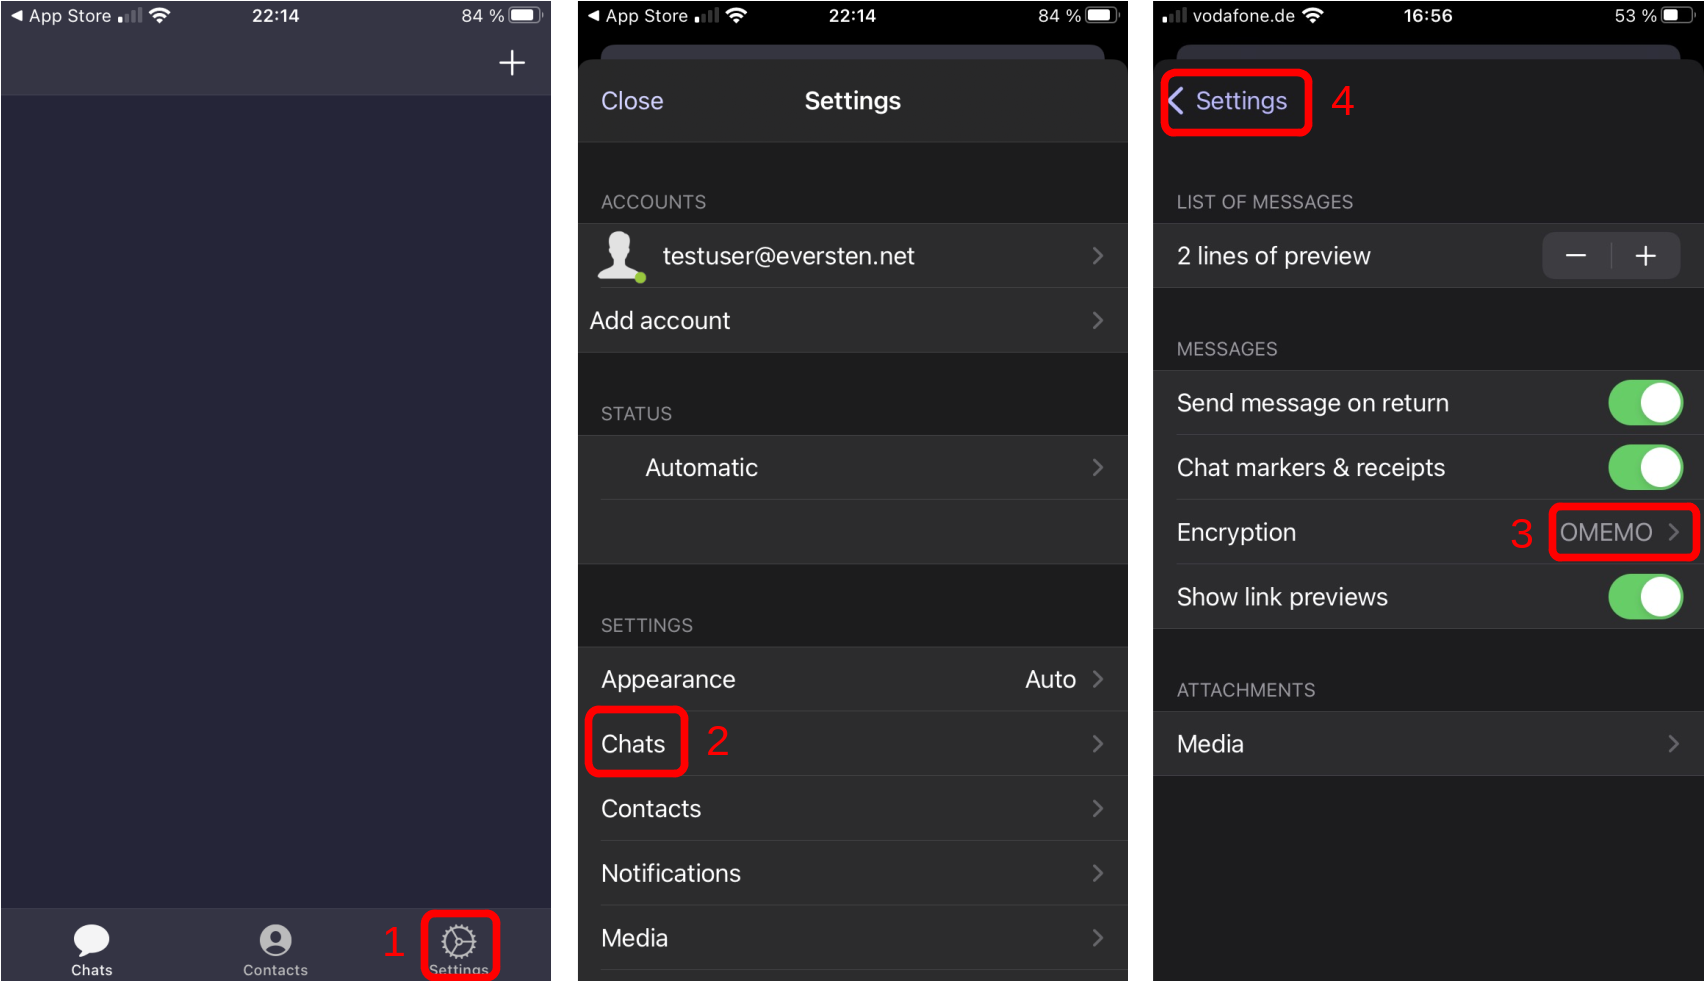
First, you visit the settings menu by selecting Settings. Then you need to select Chats. In this submenu you can activate the end-to-end-encryption (called OMEMO). Afterwards, you go back to the settings menu by clicking Settings.
ATTENTION: There is a bug in Siskin 7.0. Siskin ignores the default encryption setting and sends messages unencrypted instead. You need to activate the encryption in each chat manually. This bug will hopefully be fixed in version 7.0.1.

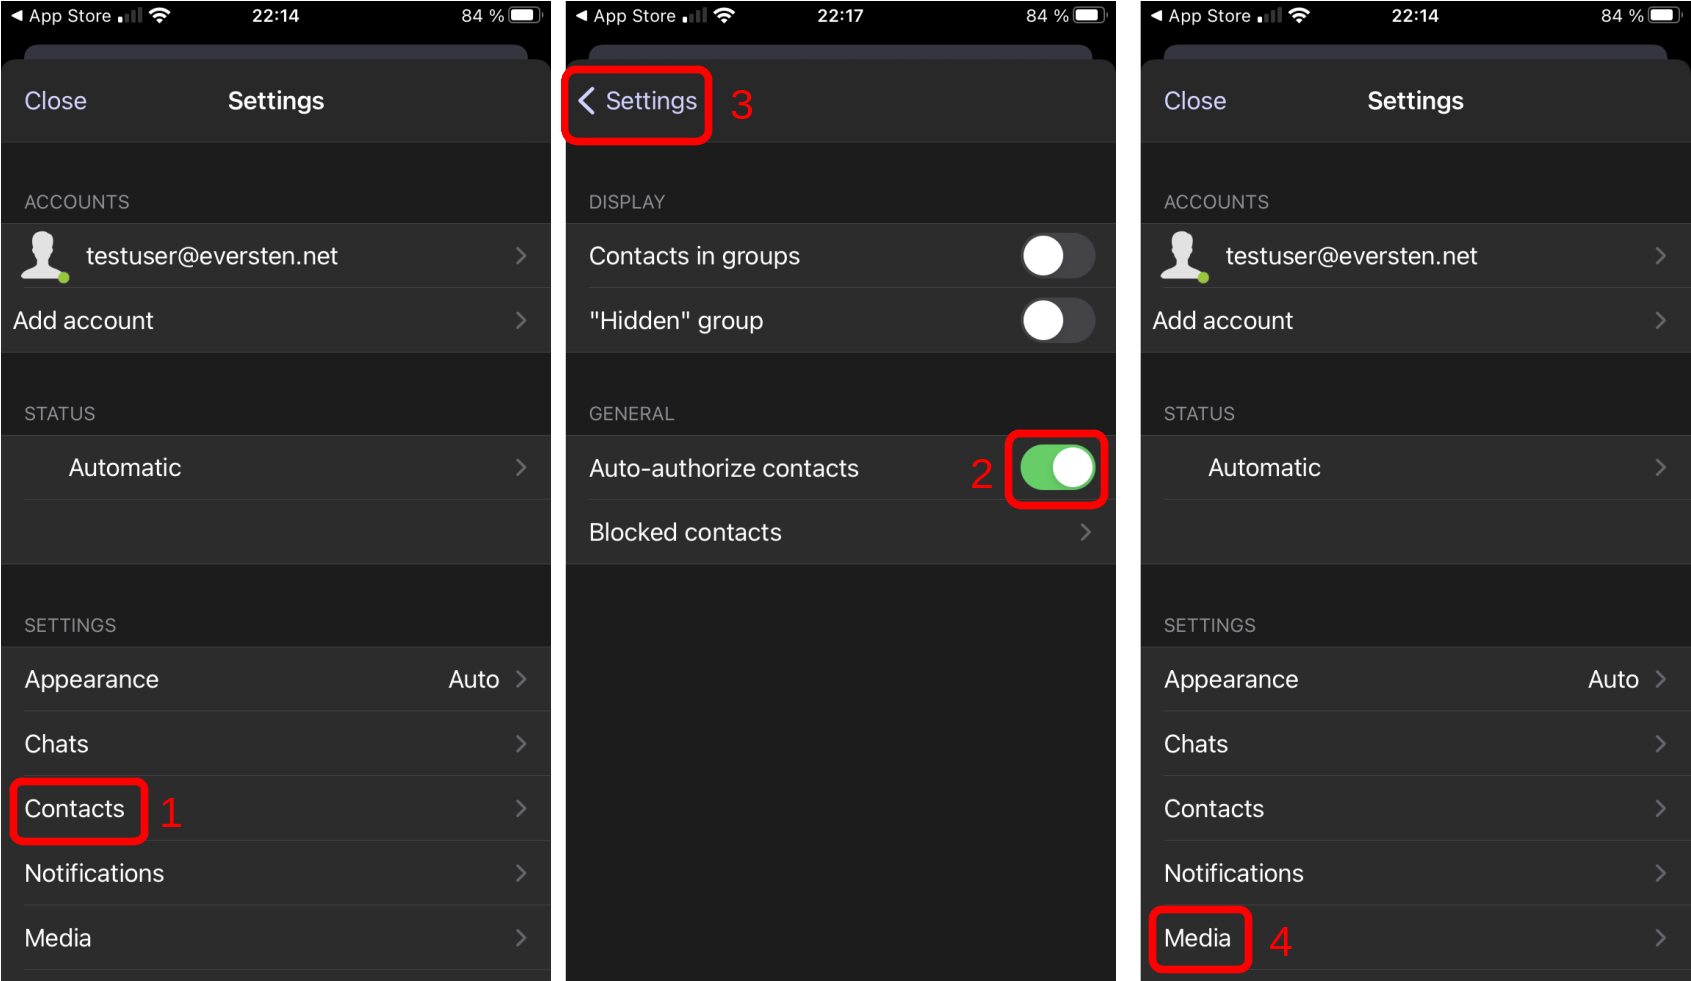
In the settings menu you have to select Contacts. You activate the switch Auto-authorize contacts and return to the settings menu by clicking Settings. Afterwards, you can select Media.

In this submenu you can optimize the settings for file exchange. You should select *File sharing via HTTP" and set the *File download limit" to 4 MB. Now you can send files and upload them to your XMPP server (instead of sending them directly to your communication partner). Files which you receive will be downloaded automatically if their size is below 4 MB.
Afterwards, you go back to the settings menu and select Experimental. Here you can activate the Groupchat bookmark sync to be able to see your group chats on multiple devices. Additionally, I recommend to deactive the usage of public STUN servers. Most todays XMPP servers already provide a STUN-service.
After this step you can go back to the settings menu and close it. The optimization of settings is done.
Adding your first contact
Now it is time to add your first contact (if you already know an XMPP address of another person). In this tutorial the contact friend@eversten.net will be added.
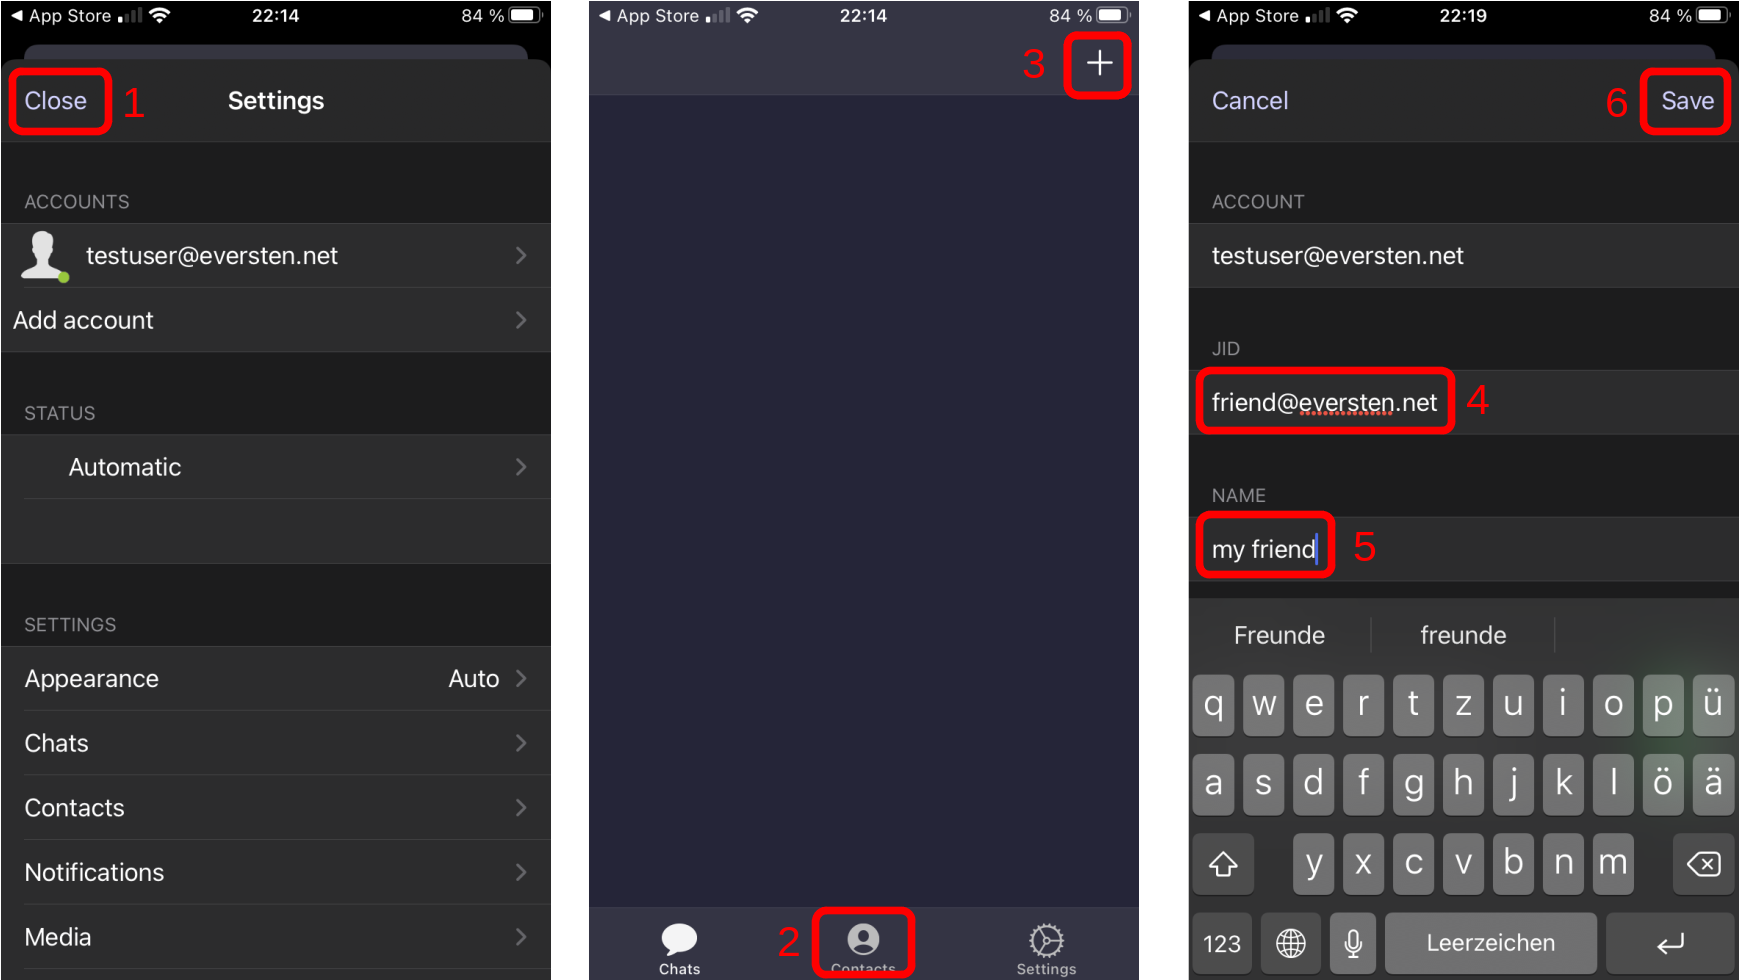
Close the settings menu (if it is still open). Now you have to click on Contacts and select the +-sign at the top of the screen. Siskin IM asks you which XMPP address you would like to add to your contact list. Additionally, you can set a name which is displayed for this contact. In this tutorial my friend is selected as the name for the contact. Now you select Save. The contact is now added to your contact list and you can send your first message.
Please be aware that your contact list and the names of your contact are stored on the XMPP server. This means that your contact list is synchronized between your devices which use this XMPP account.

Conclusion
Congratulations. You have registered and XMPP address, installed an XMPP client and optimized the configuration settings. If you do not like Siskin IM and switch to a different app you can use the same XMPP account. You just need to know your XMPP address and you password.